
Author Archives: rai

Understanding the Differences Between LNBs and LNAs

In the realm of satellite communication and radio frequency (RF) applications, two crucial components often discussed are the Low Noise Block downconverter (LNB) and the Low Noise Amplifier (LNA). While both play essential roles in signal processing, they serve distinct functions and have different characteristics.


What is an LNB?

An LNB is primarily responsible for receiving satellite signals and converting them from high frequencies (such as Ku or Ka bands) to lower frequencies (L-band). This conversion is essential for transmitting the signals over coaxial cables to a receiver. An LNB typically comprises several components, including an LNA, a mixer, and a local oscillator. Its primary usage is in satellite dishes, where it captures signals from satellites. However, due to its multi-component design, an LNB generally has a higher noise figure, which can affect signal quality.


What is an LNA?

In contrast, an LNA focuses solely on amplifying weak radio frequency signals. Its design aims to minimize added noise during amplification, thereby preserving the integrity of the signal. An LNA usually consists of amplifying devices like transistors and is utilized in a variety of applications, including telecommunications and RF front-end systems. Because of its specialized design, an LNA typically has a low noise figure, making it effective in enhancing weak signals.


Key Differences

Characteristic LNB LNA
Functionality Converts satellite signals to lower frequencies. Amplifies weak RF signals.
Components Includes an LNA, mixer, and local oscillator. Mainly consists of amplifying devices.
Typical Usage Used in satellite dishes. Found in various RF applications.
Noise Figure Generally higher due to multiple components. Designed for low noise to enhance signal integrity.

RG223 vs LMR 240: Exploring the Differences in Coaxial Cables

When it comes to coaxial cables, two popular options are the RG223 and LMR240. These cables are widely used in various applications, from radio frequency (RF) communication to video transmission. In this article, we’ll delve into the key differences between these two coaxial cable types, highlighting their unique features, performance characteristics, and suitable applications.


Comparing RG223 and LMR240 Coaxial Cables

Specification RG223 LMR240
Impedance 50 Ohms 50 Ohms
Outer Diameter 0.216 inches (5.49 mm) 0.240 inches (6.10 mm)
Attenuation at 100 MHz 0.39 dB/m 0.33 dB/m
Attenuation at 1 GHz 1.29 dB/m 1.01 dB/m
Attenuation at 3 GHz 2.30 dB/m 1.82 dB/m
Minimum Bend Radius 20 mm 25 mm
Maximum Operating Voltage 1500 V 1500 V
Temperature Range -55°C to +200°C -65°C to +200°C


RG223 Coaxial Cable

The RG223 coaxial cable is a type of 50-ohm cable that is widely used in various applications, including radio frequency (RF) communications, video transmission, and test equipment. It is known for its reliable performance and ruggedness, making it a popular choice in harsh environments.

One of the key features of the RG223 is its small outer diameter, which makes it highly flexible and easy to route in tight spaces. This cable is often used in applications where space is limited, such as in-vehicle installations or portable equipment.


LMR240 Coaxial Cable

The LMR240 coaxial cable is another 50-ohm option that is designed for superior performance and reliability. This cable is often used in applications that require low signal loss, such as cellular networks, satellite communications, and high-frequency radio systems.

Compared to the RG223, the LMR240 has a slightly larger outer diameter, which provides better shielding and lower attenuation. This makes it a more suitable choice for longer cable runs or applications where signal integrity is of utmost importance.

PLL vs DRO LNB: What’s The Difference?

When it comes to satellite communication, the choice between a Phase-Locked Loop (PLL) and a Dielectric Resonator Oscillator (DRO) Low Noise Block (LNB) can have a significant impact on signal quality and reception. 


Understanding the Basics

The LNB is a critical component in satellite reception systems, responsible for converting the high-frequency satellite signal into a lower frequency that can be processed by the satellite receiver. The L.O. (Local Oscillator) frequency generated by the LNB is the key to this conversion process. PLL and DRO are two different techniques used to generate this frequency.


PLL vs. DRO: A Technical Breakdown

Feature PLL DRO
Oscillator Type Phase-Locked Loop Dielectric Resonator Oscillator
Stability High (±500 kHz to ±25 kHz) Low (±1 MHz to ±3 MHz)
Temperature Sensitivity Low High
Cost Higher Lower

A PLL oscillator uses a more accurate reference clock and a feedback circuit to maintain a stable output frequency, while a DRO is a simpler and less expensive device that relies on a ceramic disc to resonate at a specific frequency. The tradeoff is that PLL LNBs offer superior stability and accuracy.


When to Choose PLL or DRO LNB

The choice between a PLL or DRO LNB depends on the specific needs of your satellite reception setup and the type of signals you’re trying to receive.

DRO LNB: Best for Strong, Stable Signals

  • DRO LNBs are well-suited for receiving powerful, “fat” DVB-S MPEG-2 signals, such as those found on 97W/Galaxy 19.
  • These signals are already strong and don’t require a high degree of frequency accuracy for decent reception.
  • DRO LNBs are often used in more affordable satellite systems or dedicated setups for religious/ethnic programming (Allseeing Technology, 2019).


PLL LNB: Excelling at Weak and DVB-S2 Signals

  • PLL LNBs are the preferred choice for enthusiasts and commercial users who need to receive weaker signals, DVB-S2 transmissions, and signals with high Forward Error Correction (FEC).
  • The superior stability and accuracy of PLL oscillators allow them to “thread the needle” and lock onto these challenging signals much more effectively than DRO LNBs.
  • PLL LNBs can also provide higher signal strength, better rain fade resistance, and the ability to receive more channels, including those that may be out of reach for DRO-based systems (Allseeing Technology, 2019).


The Rise of Affordable PLL LNBs

Until recently, PLL LNBs were primarily used in high-end commercial and enthusiast-level satellite systems due to their higher cost. However, a recent technological advancement has led to the development of a single-IC Ku-band PLL oscillator, enabling manufacturers to offer PLL LNBs at more affordable prices (Allseeing Technology, 2019).

This breakthrough has been a game-changer, allowing everyday satellite enthusiasts to benefit from the superior performance of PLL technology without breaking the bank. As more manufacturers adopt this new PLL IC, the availability and affordability of PLL LNBs are expected to continue improving.


Key Features at a Glance

  • PLL LNBs offer significantly better stability and accuracy than DRO LNBs, especially for weak and DVB-S2 signals.
  • DRO LNBs are suitable for strong, stable signals like those found on 97W/Galaxy 19, but may struggle with more challenging transmissions.
  • Affordable PLL LNBs are now available thanks to a new single-IC Ku-band PLL oscillator, making this advanced technology accessible to a wider audience.
  • The choice between PLL and DRO LNBs depends on the specific requirements of your satellite reception setup and the type of signals you need to receive.


Source:
Allseeing Technology. (2019). PLL vs DRO LNB – Which is better?

Unraveling the Difference: 10G SFP vs 10G SFP+

In the ever-evolving world of networking, the selection of the right connectivity solution can make all the difference in terms of performance, reliability, and cost-efficiency. Two of the most widely-used options in this realm are 10G SFP and 10G SFP+, each with its own unique characteristics and capabilities.

To help you make an informed decision, let’s delve into the key differences between these two technologies:


Physical Specifications

  10G SFP 10G SFP+
Connector Type SC, LC, or MPO LC or MPO
Data Rate Up to 10 Gbps Up to 10 Gbps
Reach Up to 10 km (62.5μm) or Up to 10 km (9μm) or
  40 km (9μm) 40 km (9μm)
Power Consumption Higher Lower

The primary physical distinction between 10G SFP and 10G SFP+ lies in their connector types. 10G SFP supports SC, LC, or MPO connectors, while 10G SFP+ is limited to LC or MPO connectors. This difference can be crucial in terms of compatibility and interoperability with existing network infrastructure (Cisco, 2021).


Electrical Specifications

  10G SFP 10G SFP+
Signaling Type NRZ (Non-Return-to-Zero) PAM4 (Pulse Amplitude Modulation 4-level)
Transmitter Power +1 dBm to +4 dBm -8.2 dBm to +0.5 dBm
Receiver Sensitivity -6 dBm to -1 dBm -11.1 dBm to -1 dBm

The key electrical difference between 10G SFP and 10G SFP+ lies in their signaling types. 10G SFP utilizes NRZ (Non-Return-to-Zero) signaling, while 10G SFP+ employs PAM4 (Pulse Amplitude Modulation 4-level) signaling. This distinction affects the power consumption, as well as the transmitter power and receiver sensitivity requirements (IEEE, 2016).


Performance Considerations

  • Bandwidth: Both 10G SFP and 10G SFP+ offer a maximum data rate of 10 Gbps, making them suitable for high-speed networking applications.
  • Power Consumption: 10G SFP+ typically has a lower power consumption compared to 10G SFP, making it a more energy-efficient option, especially in high-density deployments (Finisar, 2020).
  • Reach: While both technologies can support distances up to 10 km (62.5μm) or 40 km (9μm), the 10G SFP+ has a slightly longer reach due to its improved signaling and optical characteristics (Cisco, 2021).
  • Compatibility: 10G SFP is generally compatible with a wider range of network equipment, as it utilizes more common connector types. 10G SFP+, on the other hand, may require specialized equipment or adapters for certain deployments (Finisar, 2020).


Use Cases and Applications

The choice between 10G SFP and 10G SFP+ often depends on the specific networking requirements and the existing infrastructure. Here are some common use cases for each:


10G SFP

  • Legacy Network Upgrades: 10G SFP is a more straightforward replacement for older 1G or 10G SFP ports, as it utilizes the same connector types (Cisco, 2021).
  • Cost-Sensitive Deployments: 10G SFP is generally more affordable than 10G SFP+, making it a viable option for budget-conscious projects (Finisar, 2020).
  • Shorter-Distance Connections: For network links within a few kilometers, 10G SFP may be a suitable and cost-effective solution (Cisco, 2021).


10G SFP+

  • High-Density Deployments: The lower power consumption of 10G SFP+ makes it a preferred choice for high-density networking environments, such as data centers and cloud computing facilities (Finisar, 2020).
  • Longer-Distance Connections: The improved signaling and optical characteristics of 10G SFP+ allow for longer transmission distances, making it a better fit for wide-area network (WAN) applications (Cisco, 2021).
  • Future-Proofing: As the industry continues to evolve, 10G SFP+ is more likely to maintain compatibility with newer networking technologies and standards (Finisar, 2020).

In conclusion, the choice between 10G SFP and 10G SFP+ should be based on a careful analysis of your specific networking requirements, existing infrastructure, and long-term goals. By understanding the key differences in physical, electrical, and performance characteristics, you can make an informed decision that will ensure the optimal performance and cost-effectiveness of your network.


Key Features:

  • 10G SFP supports SC, LC, or MPO connectors, while 10G SFP+ is limited to LC or MPO
  • 10G SFP uses NRZ signaling, while 10G SFP+ uses PAM4 signaling
  • 10G SFP+ has lower power consumption and slightly longer reach compared to 10G SFP
  • 10G SFP is more compatible with a wider range of network equipment, while 10G SFP+ is better suited for high-density and long-distance applications


Sources:

  • Cisco. (2021). Understanding 10 Gigabit Ethernet SFP+ Optics. Retrieved from https://www.cisco.com/c/en/us/products/collateral/interfaces-modules/transceiver-modules/data_sheet_c78-660083.html
  • IEEE. (2016). IEEE Standard for Ethernet Amendment 10: Media Access Control Parameters, Physical Layers, and Management Parameters for 200 Gb/s and 400 Gb/s Operation. Retrieved from https://standards.ieee.org/standard/802_3cd-2018.html
  • Finisar. (2020). 10G SFP+ vs. SFP28 Transceivers. Retrieved from https://www.finisar.com/sites/default/files/resources/10g-sfp-vs-sfp28-transceivers.pdf

RG58 vs. LMR400: Choosing the Right Coaxial Cable for Your Needs

When it comes to coaxial cables, two of the most common types are RG58 and LMR400. While they may seem similar, these cables have distinct characteristics that make them suitable for different applications. Understanding the differences between RG58 and LMR400 is crucial for anyone working with or selecting the right cable for their needs.


Characteristic Comparison

Characteristic RG58 LMR400
Impedance 50 ohms 50 ohms
Diameter 0.195 inches 0.405 inches
Attenuation Higher Lower
Flexibility More flexible Less flexible
Cost Less expensive More expensive


Application Differences

Application RG58 LMR400
Usage Low-power, short-distance (e.g. amateur radio, CCTV, jumper cables) High-power, long-distance (e.g. cellular networks, satellite communications, military communications)


By understanding the key differences between RG58 and LMR400 cables, readers can make informed decisions when selecting the appropriate cable for their specific needs, whether it’s for a home wireless network or a complex communication system.

Comparing Attenuation Performance: LMR-240, RG-58, and RG-223

When it comes to coaxial cable performance, the attenuation characteristics are crucial, as they directly impact the signal integrity and transmission efficiency. Let’s take a closer look at how the LMR-240 from Times Microwave Systems compares to the more traditional RG-58 and RG-223 cables in terms of attenuation:


Frequency LMR-240 Attenuation (dB/100ft) RG-58 Attenuation (dB/100ft) RG-223 Attenuation (dB/100ft)
1 GHz 2.1 [1] 4.9 [2] 3.5 [2]
3 GHz 3.5 [1] 8.1 [2] 6.0 [2]
6 GHz 5.3 [1] 12.0 [2] 9.3 [2]
10 GHz 7.6 [1] 17.5 [2] 14.0 [2]


As the table clearly illustrates, the LMR-240 cable offers significantly lower attenuation rates across all the tested frequencies when compared to the RG-58 and RG-223 cables.

At 1 GHz, the LMR-240 has an attenuation of just 2.1 dB/100ft [1], while the RG-58 and RG-223 cables exhibit attenuation levels of 4.9 dB/100ft [2] and 3.5 dB/100ft [2], respectively. This difference becomes even more pronounced at higher frequencies, with the LMR-240 maintaining a clear advantage.

For instance, at 10 GHz, the LMR-240 has an attenuation of 7.6 dB/100ft [1], whereas the RG-58 and RG-223 cables experience much higher attenuation levels of 17.5 dB/100ft [2] and 14.0 dB/100ft [2], respectively.

This superior attenuation performance of the LMR-240 cable is a key factor in its widespread adoption across various industries, where signal integrity and transmission efficiency are of utmost importance, such as in telecommunications, satellite communications, and high-frequency RF systems.

By providing this side-by-side comparison, I aim to highlight the distinct advantages of the LMR-240 coax cables from Times Microwave Systems, positioning them as a preferred choice over the more traditional RG-58 and RG-223 cable options.


Sources:

[1] Times Microwave Systems, “LMR-240 Coax Cables Datasheet”

[2] RF Cafe, “Coaxial Cable Attenuation Comparison Chart”


What Does “RG” mean in RG cables?

The “RG” in RG cables stands for “Radio Guide”. This is a standardized designation system that was developed by the United States military during World War II to specify different types of coaxial cables.
 
The “RG” nomenclature was first introduced in the 1940s by the Joint Army-Navy Specification (JAN) to create a consistent way of identifying the various coaxial cable designs and their intended applications.
 
Here’s a breakdown of what the “RG” numbers signify:
 
  • RG-6 – A common coaxial cable used for cable TV, satellite TV, and other broadband applications.
  • RG-59 – A thinner coaxial cable used for video and CCTV applications.
  • RG-8 – A heavier, low-loss cable used for longer distance runs, such as amateur radio and CB radio.
  • RG-11 – Similar to RG-8, but with a slightly different impedance and used for applications like CATV trunk lines.
  • RG-58 – A thin, flexible cable commonly used for test equipment and some RF applications.
 
The “RG” designation provides a standardized way to quickly identify the key specifications and intended uses of different coaxial cable types, which was very useful for the military and later the broader electronics industry.

What’s The Best RG cable for 2 Way Radio Communication

When it comes to two-way radio communication, the choice of RG cable can have a significant impact on the quality and reliability of the signal. The best RG cable for two-way radio communication depends on several factors, including the frequency range, power requirements, and environmental conditions.

One of the most popular RG cable options for two-way radio communication is RG-58. This cable is relatively inexpensive, flexible, and suitable for lower-power applications. RG-58 is often used in handheld radios, mobile installations, and short-range applications. However, it is important to note that RG-58 has higher signal loss compared to other RG cable types, which can affect the range and performance of the two-way radio system.

Another option to consider is RG-213. This cable is thicker and more robust than RG-58, making it better suited for higher-power applications and longer cable runs. RG-213 has lower signal loss and can provide better performance over longer distances. It is commonly used in base station and repeater installations, as well as in mobile applications where longer cable runs are required.

For applications that require even lower signal loss and greater durability, RG-8 or RG-8X cables may be a suitable choice. These cables are larger in diameter and offer superior shielding, which can improve signal quality and reduce interference. RG-8 and RG-8X are often used in high-power base station applications, as well as in outdoor or harsh environments where the cable needs to withstand the elements.

When selecting the best RG cable for your two-way radio communication needs, it’s important to consider factors such as frequency range, power requirements, cable length, and environmental conditions. Consulting with an experienced radio or cable specialist can help you make an informed decision and ensure that your two-way radio system operates at its optimal performance.

Is RG-8 on its Way Out?

In the ever-evolving world of technology, the landscape of coaxial cables is undergoing its own transformation. One cable that has been a staple in the industry for decades is the RG-8 coaxial cable, and the question arises: is this well-established option still holding its ground or gradually being phased out?

To explore the current status of the RG-8 coaxial cable, we must examine its history and the factors that have influenced its usage over the years.

The RG-8 coaxial cable, also known as the “Heliax” cable, has been a trusted choice for a variety of applications, including amateur radio, television broadcasting, and high-frequency data transmission. Its robust construction and low signal loss made it a popular pick for long-distance and high-power scenarios.

However, as technology has advanced, newer coaxial cable options have emerged, presenting competition to the RG-8. The RG-6 and RG-11 cables, for instance, offer improved characteristics such as higher bandwidth, lower attenuation, and more effective shielding.

This shift in the market has led to a gradual transition, with some organizations and applications favoring the newer cable types over the RG-8. The growing demand for higher-performance and more versatile coaxial cable solutions has been a driving force behind this change.

Despite the emergence of these newer options, the RG-8 coaxial cable still maintains a presence in certain specialized sectors, particularly in the amateur radio and military domains. Its robust construction and reliable performance continue to make it a viable choice for specific use cases.

The RG-8 coaxial cable, while not as ubiquitous as it once was, has not been entirely phased out. The industry is experiencing a gradual transition towards newer cable types, but the RG-8 still holds a place in certain specialized applications. As technology continues to evolve, it will be fascinating to observe how the coaxial cable landscape further adapts and shapes the future of communication and data transmission.

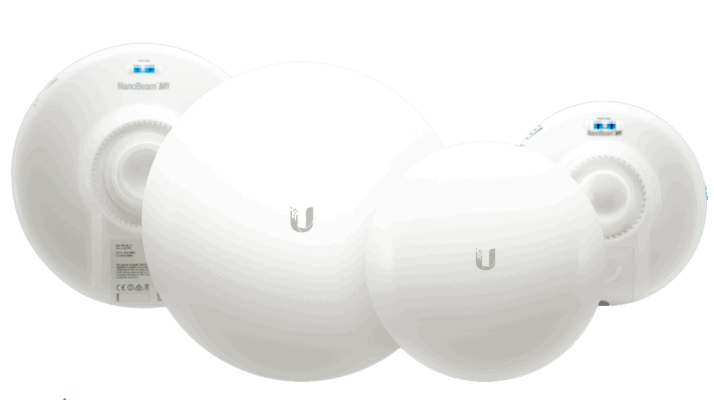
What Does a NanoBeam M5 Do? A Comprehensive Guide

The NanoBeam M5 is an exciting piece of technology that plays a significant role in modern internet connectivity. If you’re new to this concept, don’t worry! We’ll break it down into simple terms and make it engaging.


What is the NanoBeam M5?

The NanoBeam M5 is a wireless networking device made by Ubiquiti Networks. Its primary function is to create a reliable internet connection between two points without the need for physical cables. This is particularly useful in areas where traditional internet connections are limited or unavailable.

Key Features of the NanoBeam M5

To better understand the NanoBeam M5, let’s look at some of its key features:

Feature Description
High Throughput Offers speeds of over 150 Mbps, ensuring fast internet.
Long Range Can connect over distances of up to 15 km (about 9 miles).
Compact Design Lightweight and easy to install in various locations.
Weatherproof Built to withstand harsh weather conditions.
User-Friendly Simplified setup process, making it accessible for everyone.


How Does the NanoBeam M5 Work?

Understanding how the NanoBeam M5 works is essential. Here’s a simplified explanation:

  1. Components: The device has two main parts: a transmitter and a receiver. The transmitter sends data, while the receiver picks it up.

  2. Wireless Communication: It uses radio waves to send data between the two devices. This means there’s no need for cables, making it flexible and adaptable.

  3. Line of Sight: For optimal performance, the devices need to be in a straight line with no obstacles (like buildings or trees) blocking the signal. This is called a clear line of sight.


Applications of the NanoBeam M5

The NanoBeam M5 is versatile and can be used in various scenarios:

  • Home Networking: Extend your home internet to areas where the signal is weak.
  • Business Connectivity: Connect multiple buildings wirelessly, ensuring all locations have a strong internet connection.
  • Rural Areas: Provide internet access to remote locations lacking traditional infrastructure.
  • Temporary Events: Quickly set up a reliable internet connection for events like festivals or conferences.


Why Choose the NanoBeam M5?

There are several reasons to consider using the NanoBeam M5:

  • Cost-Effective: Setting up a wireless bridge can be cheaper than installing traditional wired connections.
  • Flexibility: Easily relocate or expand your network without worrying about cable management.
  • Scalability: As your needs grow, you can add more NanoBeam units to your setup.


Tips for Optimal Use

To maximize the benefits of your NanoBeam M5, keep these tips in mind:

  • Ensure Clear Line of Sight: Position the devices correctly to avoid obstructions.
  • Proper Mounting: Follow installation instructions to maintain signal quality.
  • Firmware Updates: Regularly check for firmware updates to improve performance and security.


Technical Specifications

Here are some important technical specifications of the NanoBeam M5:

Specification Details
Frequency 5 GHz
Gain 25 dBi
Power Supply 24V Passive PoE
Ethernet Port 10/100 Mbps
Dimensions 400 x 400 x 150 mm


How to Set Up the NanoBeam M5

Setting up the NanoBeam M5 is straightforward. Here’s a step-by-step guide:

  1. Mount the Devices: Install the transmitter and receiver in locations with a clear line of sight.
  2. Connect Power: Use the provided power over Ethernet (PoE) adapter to power the devices.
  3. Configure Settings: Access the device settings via a web browser to configure your network.
  4. Test the Connection: After setup, test the connection to ensure everything is working smoothly.


Troubleshooting Common Issues

If you encounter problems while using the NanoBeam M5, here are some common troubleshooting tips:

  • Weak Signal: Check for obstructions in the line of sight and adjust the positioning of the devices.
  • Connection Drops: Ensure that the firmware is updated and check cable connections.
  • Slow Speeds: Verify that the devices are configured correctly and that there are no interference issues.


For more information about the NanoBeam M5, including purchasing options, check out this link.

This site uses cookies to offer you a better browsing experience. By browsing this website, you agree to our use of cookies.